
More Videos You May Like

How To: Crochet Arcade Stitch
-
17:44
Learn how to master Arcade Stitch in this tutorial. This stitch creates a...
Learn how to master Arcade Stitch in this tutorial. This stitch creates a...
How to: Knit Slip One Knitwise
-
1:37
We're all about quick, easy solutions to help you knit. Learn how to slip...
We're all about quick, easy solutions to help you knit. Learn how to slip...
How to: Knit Picking up Stitches
-
5:28
In this video, you'll learn how to master picking up stitches. This...
In this video, you'll learn how to master picking up stitches. This...
How to: Knit Stocking Stitch
-
3:10
Learn how to make the most iconic stitch and you'll be ready for any...
Learn how to make the most iconic stitch and you'll be ready for any...
How to: Cast on with the long-tail cast on technique
-
3:12
Learn how to cast on with our long-tail tutorial. This classic cast on...
Learn how to cast on with our long-tail tutorial. This classic cast on...
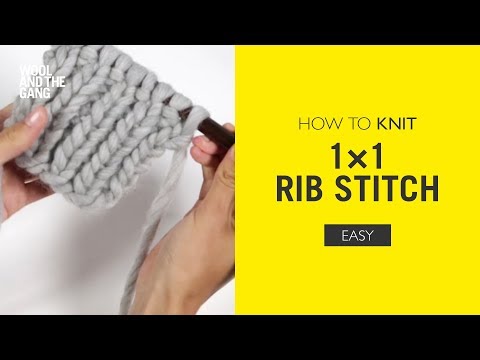
How To: Knit 1x1 Rib
-
3:13
Learn how to do a 1x1 rib stitch by following our step-by-step video...
Learn how to do a 1x1 rib stitch by following our step-by-step video...
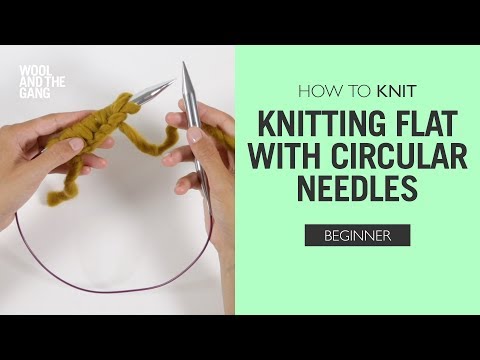
How to: Knit flat with circular needles
-
3:08
Does your project call for circular needles, or are you just partial to...
Does your project call for circular needles, or are you just partial to...

How to: Knit Horizontal Invisible Seam In Rib Stitch
-
2:42
Learn how to create invisble joins when seaming rib stitch together. This...
Learn how to create invisble joins when seaming rib stitch together. This...
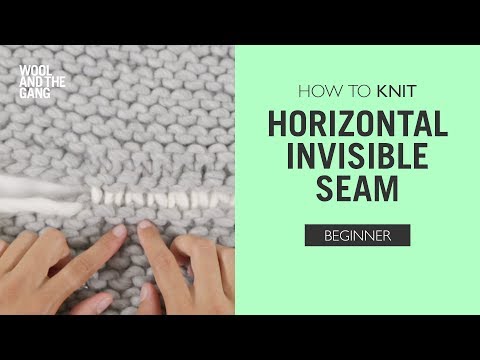
How to: Knit Horizontal Invisible Seam
-
7:23
Ready to sew your finished pieces together? Learn how to use the horizontal...
Ready to sew your finished pieces together? Learn how to use the horizontal...
How To: Crochet Slip Stitch Seam
Ready to learn how to crochet the slip stitch seam? This handy technique creates an invisible join on the... Read more
Ready to learn how to crochet the slip stitch seam? This handy technique creates an invisible join on the right side of your crochet, and a neat seam on the wrong side – very useful when joining your pieces together. The video uses US crochet terms.
Read lessReady to learn how to crochet the slip stitch seam? This handy technique creates an invisible join on the right side of your crochet, and a neat seam on the wrong side – very useful when joining your pieces together. The video uses US crochet terms.
See the step by step guide here
Level:
Easy
Craft:
Crochet
Type:
Technique
More Videos You May Like
![]()
![]()
-
More Videos You May Like
How To: Crochet Arcade Stitch - 17:44
Learn how to master Arcade Stitch in this tutorial. This stitch creates a...
How to: Knit Slip One Knitwise - 1:37
We're all about quick, easy solutions to help you knit. Learn how to slip...
How to: Knit Picking up Stitches - 5:28
In this video, you'll learn how to master picking up stitches. This...
How to: Knit Stocking Stitch - 3:10
Learn how to make the most iconic stitch and you'll be ready for any...
How to: Cast on with the long-tail cast on technique - 3:12
Learn how to cast on with our long-tail tutorial. This classic cast on...
How To: Knit 1x1 Rib - 3:13
Learn how to do a 1x1 rib stitch by following our step-by-step video...
How to: Knit flat with circular needles - 3:08
Does your project call for circular needles, or are you just partial to...
How to: Knit Horizontal Invisible Seam In Rib Stitch - 2:42
Learn how to create invisble joins when seaming rib stitch together. This...
How to: Knit Horizontal Invisible Seam - 7:23
Ready to sew your finished pieces together? Learn how to use the horizontal...
Featured in this video


Step by Step

Step 1
Place the pieces you want to join on top of each other, and line up the pieces.

Step 2
Make a slip knot and place it onto your crochet hook.

Step 3
Insert your hook through the front loop only of the first piece, then insert it through the back loop only of the second piece. Wrap the yarn around the hook and pull through all 3 loops on your hook.

Step 4
Insert your hook through the front loop only of the next stitch on the first piece, then the back loop only of the next stitch on the second piece. Wrap the yarn around the hook and pull through all 3 loops on your hook.

Step 5
Continue repeating step 4 to the end of your seam.

Step 6
Cut the yarn and pull on the hook until the end pops through to secure the last stitch.